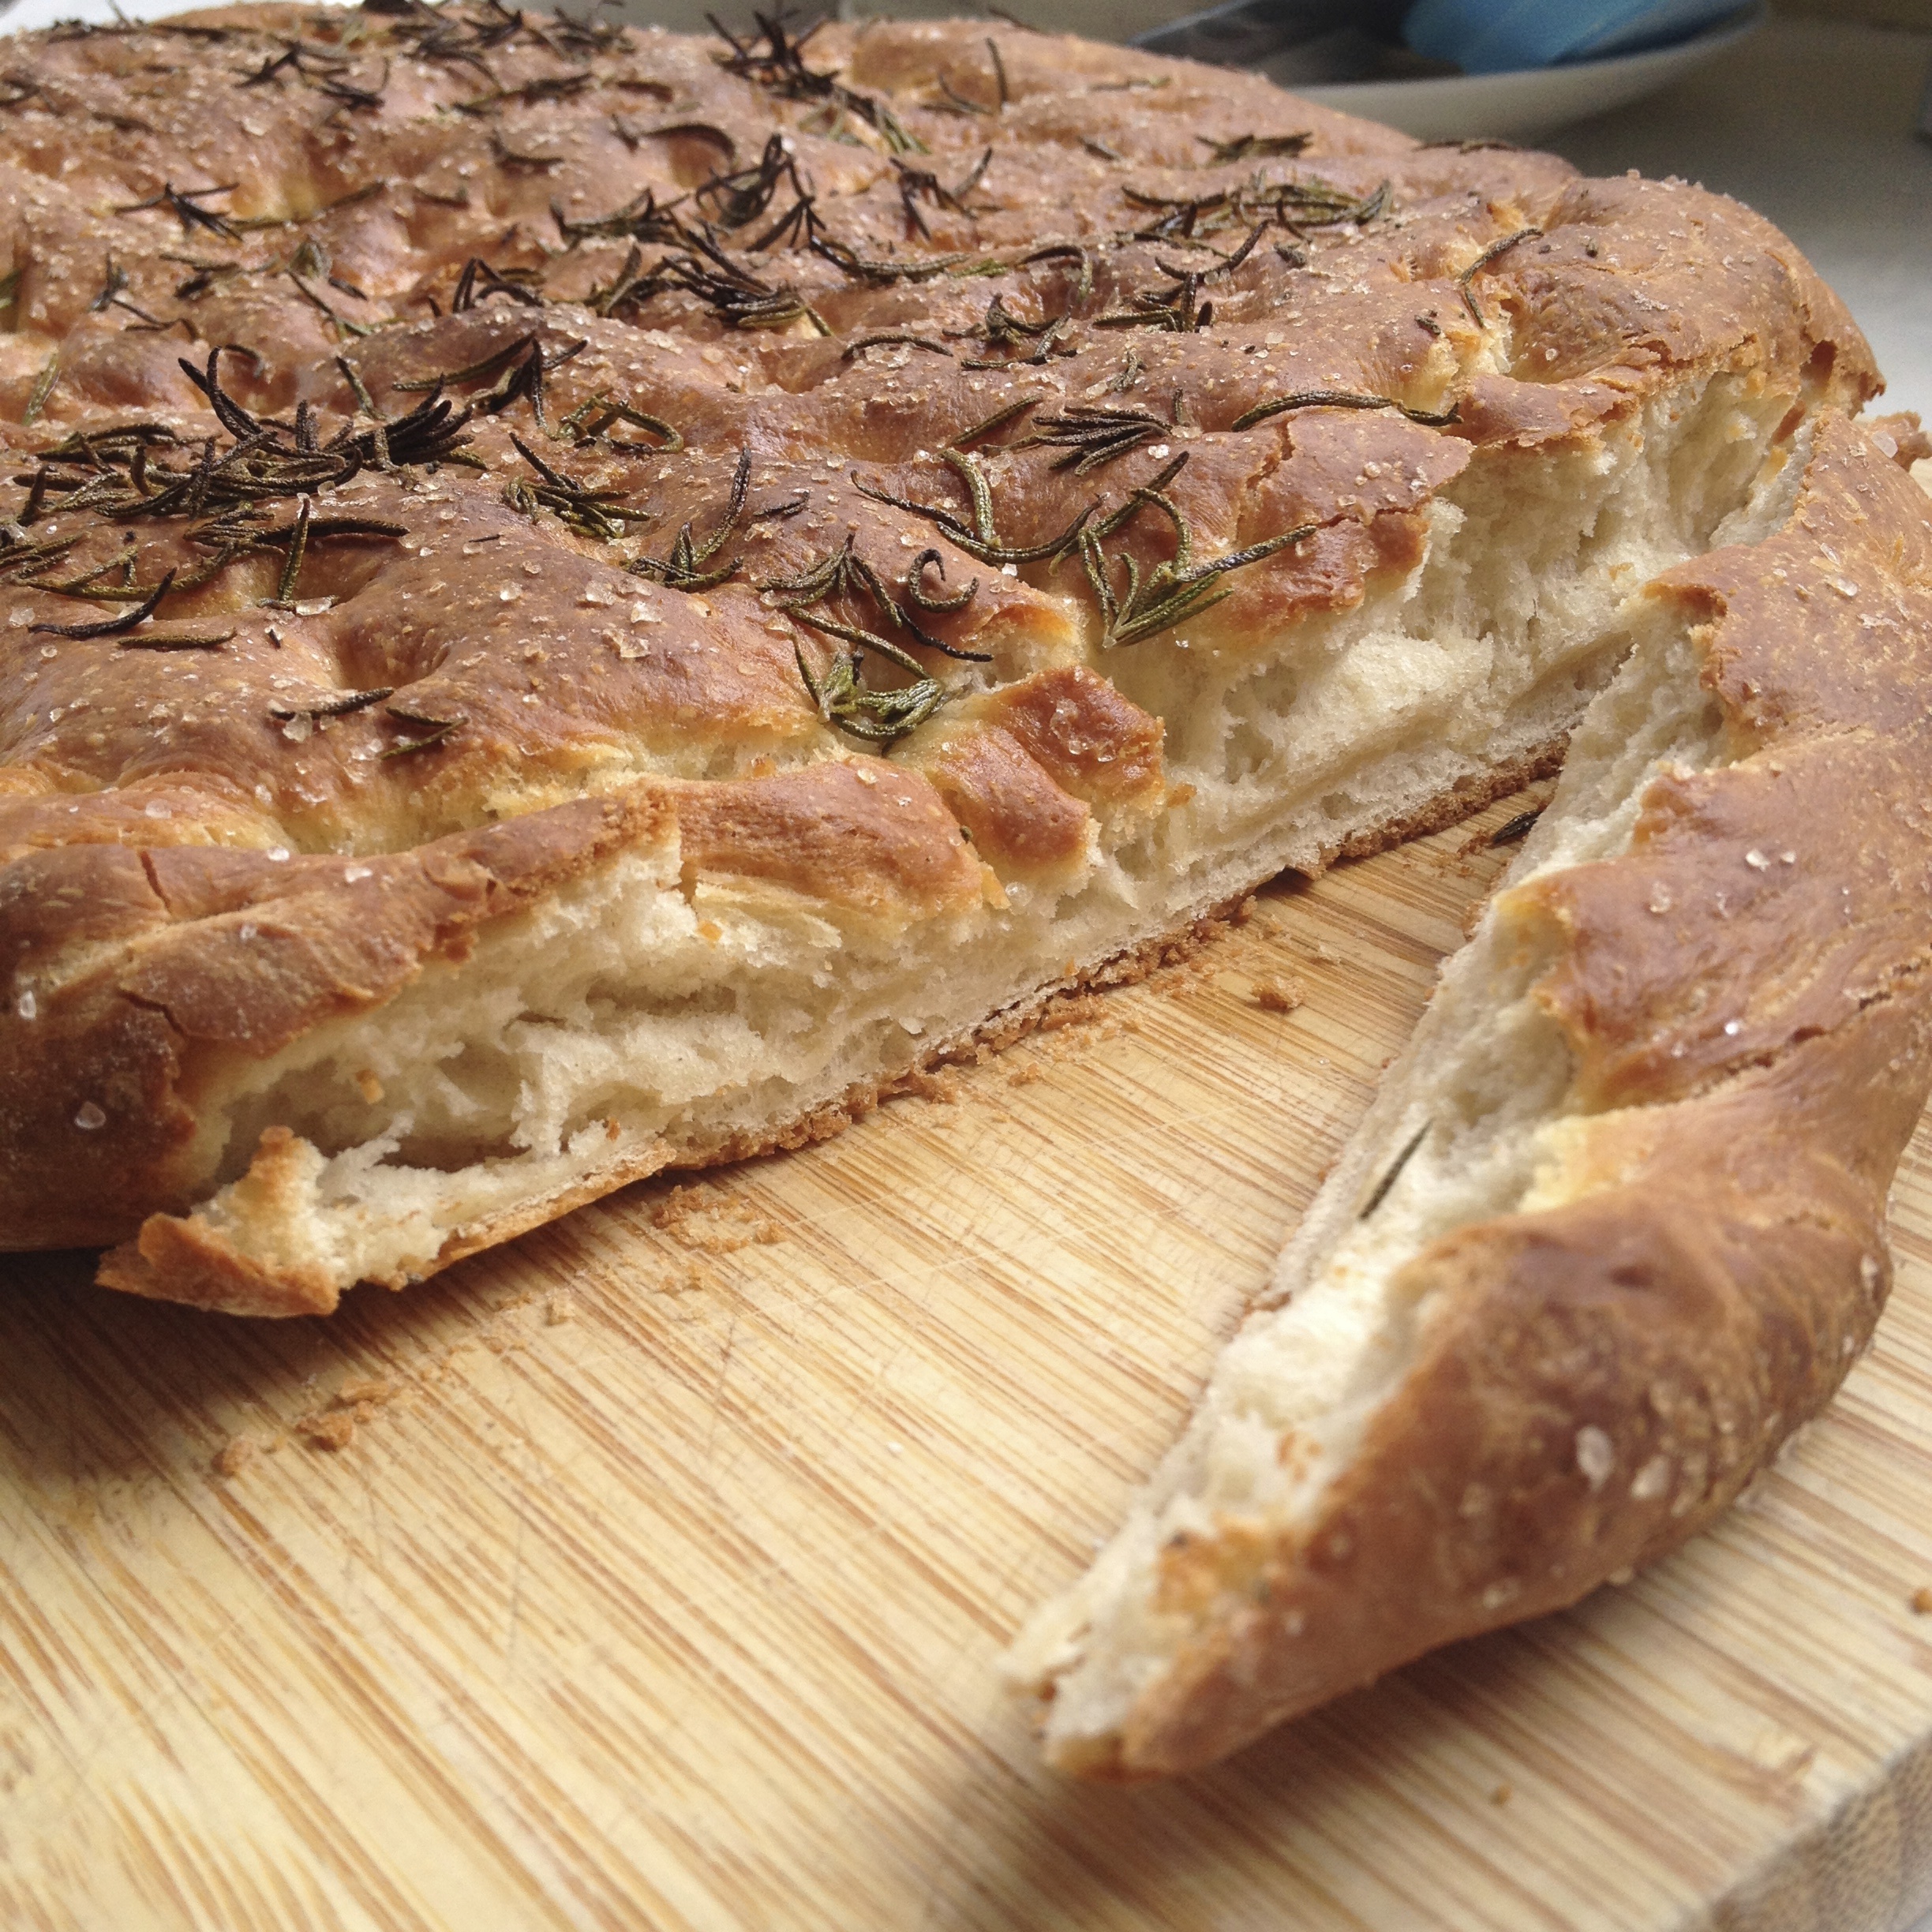
Large quantities of carbohydrate is one of the few cures to absorb the sins of a night spent on paint thinner (aka Teachers Whiskey).
Read More
Chocolate and Hazelnut Brioche Scrolls
I am practicing my brioche making skills.
Last weekend a handsome young man took me to get chocolate brioche at the farmers market. It was glorious. Why we only got one I do not know.
Read MoreSoft and Chewy Pretzels
My first experience of a real, proper bready pretzel was at the Arts Centre in Christchurch many years ago with my best friend Cara.

It was crunchy in some places but soft and warm in the fatter bits. The salt covered exterior satisfied me more than any cheeseburger or bag of mini pretzels ever could. It was like the best salty bread roll I had ever eaten. But way cooler. And tastier.
It changed my life.
I never thought I could make one myself though. I thought that they would be difficult to make.
That was until I stumbled upon a wonderful blog.

I have found that following other foodie type people on Instagram I have been able to stumble across and discover some really cool new blogs. I found this one here, The Sophisticated Gourmet which is brilliant. Unfortunately he hasn't posted since last year but he has some great recipes like this pretzel one here. I was so excited to find a decent look pretzel recipe from a reliable source. Everything is beautiful to look at. Definitely go and visit it. I can't wait to try out his bagel recipe too.

So this week has been a bit cray cray. I'm not too sure why. Probably a mix of everything. I find one of the best ways for me to calm down is to make bread. It is time consuming. You need to be patient and committed to it. You can't just make it on a whim, it needs to be planned for. I had a mad soft pretzel craving on Wednesday. Unfortunately I don't know of anywhere in Dunedin that sells these beautiful authentic pretzels so what did I do? No I didn't just make myself a piece of toast and tell myself to get over it, I freaking well made an entire batch of them.

Typical Sophie. It was like that time at 11pm I felt like a warm cookie. Most people can't be bothered if it isn't right in front of them. But not me. I will go and make myself an entire batch just so I can have one (or two . . or three . . .). I've also been known to make up corn fritters in the early hours of the morning just because I woke up and was hungry.
I was also curious as to how to make them. Pretzels are one of the few foods (other than fermented shark meat) that has a basic pH (ie above 7). Now upon reading how to make them I realise it is because they are boiled for about a minute before they are baked in a pot of water and baking soda. Boiling the pretzel in basic solution allows for the interior of the pretzel to puff up making it softer but also chewier. The baking soda allows the exterior to form a nice golden brown crust. Its an odd step compared with usual bread baking but it was actually really cool to see the small pretzels knots puff up in such a quick space of time.
Now I used the dough hook on my stand mixer to knead the dough but kneading by hand (which was originally called for) is totally sufficient and in itself very theraputic.
I have a literature review to write so I am gonna stop waffling on and get to the point!
New York Style Soft Pretzels
Adapted from The Sophisticated Gourmet (who I believe adapted it from Martha Stewart)
Makes 12
2 1/4 teaspoons active dry yeast
2 teaspoon white sugar
1 cup warm water
1 cup (128g) high grade flour
2 cups (256g) plain flour
2 teaspoons salt
35g softened butter
2 tablespoons baking soda
2 teaspoons sugar
7cm worth of boiling water in a medium sized pot (super accurate I know)
Chunky sea or rock salt
1 egg, beaten
1 teaspoon water
In a small bowl, activate the yeast with the warm water and sugar for around 10-15 minutes. It should become very foamy. If nothing happens you need to get new yeast.


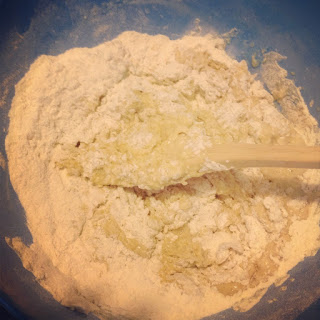
In a large bowl, mix together the flours and the salt. Either use your mixer to rub in the butter or do this by hand. You want to achieve a smooth crumb with no visible lumps of butter.

Once the yeast has been properly activated, pour the yeast liquid into a well in the centre of your flours. Use a spoon to bring the dough together.
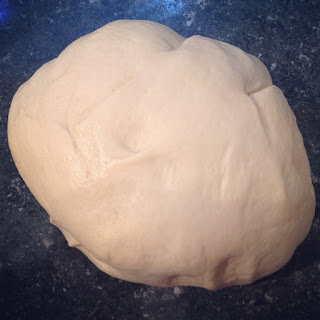
Either tip the dough onto a lightly floured bench and knead the dough for around 5 minutes or pop it into your cake mixer with the dough hook and leave it to be kneaded for around 5 minutes also. The dough should become smooth and elastic.

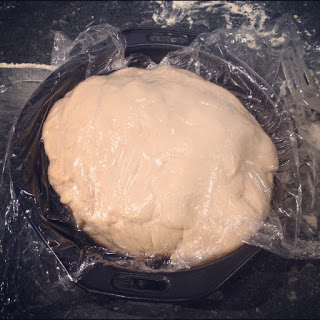
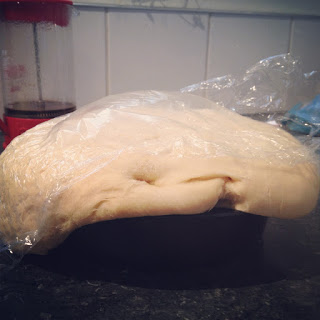
Grease up a large bowl with a small amount of oil. Place the dough into this bowl, cover in cling film then leave to rise for an hour in a warm place (like on top of the hot water cylinder). You want the dough to double in size. Apparently you can also leave it in the fridge overnight, which is handy if you want to make these early in the morning.
Cut the dough into 12 portions. Roll out each ball into a rope around 20cm long.

Bring the rope up into a large U shape.

Take the two ends and twist them around each other twice.


Bring the ends back onto the curve of the U and press down lightly to attach them.

Preheat the oven to 250 degrees C (or as high as you can go) on bake.
Bring the water in the pot to a boil. Add the sugar and baking soda.
Using a slotted spatula place three of the pretzels in the boiling water at a time. Leave to boil for 45-60 seconds before removing and leaving to drain on a cooling rack. Repeat with the rest of the pretzels.


Transfer the puffed pretzels onto a baking tray lined with baking paper.
Mix the egg and the teaspoon of water together and brush this over each pretzel.

Sprinkle over a generous amount of salt and any other topping of your choice. Poppy and sesame seeds work well.

Bake for 15 minutes until the outer surface has turned a nice dark golden brown.
Serve warm!
Make sure you eat them within 12 hours of baking them. They aren't as good after that.


Enjoy!!!
It was crunchy in some places but soft and warm in the fatter bits. The salt covered exterior satisfied me more than any cheeseburger or bag of mini pretzels ever could. It was like the best salty bread roll I had ever eaten. But way cooler. And tastier.
It changed my life.
I never thought I could make one myself though. I thought that they would be difficult to make.
That was until I stumbled upon a wonderful blog.
I have found that following other foodie type people on Instagram I have been able to stumble across and discover some really cool new blogs. I found this one here, The Sophisticated Gourmet which is brilliant. Unfortunately he hasn't posted since last year but he has some great recipes like this pretzel one here. I was so excited to find a decent look pretzel recipe from a reliable source. Everything is beautiful to look at. Definitely go and visit it. I can't wait to try out his bagel recipe too.
So this week has been a bit cray cray. I'm not too sure why. Probably a mix of everything. I find one of the best ways for me to calm down is to make bread. It is time consuming. You need to be patient and committed to it. You can't just make it on a whim, it needs to be planned for. I had a mad soft pretzel craving on Wednesday. Unfortunately I don't know of anywhere in Dunedin that sells these beautiful authentic pretzels so what did I do? No I didn't just make myself a piece of toast and tell myself to get over it, I freaking well made an entire batch of them.
Typical Sophie. It was like that time at 11pm I felt like a warm cookie. Most people can't be bothered if it isn't right in front of them. But not me. I will go and make myself an entire batch just so I can have one (or two . . or three . . .). I've also been known to make up corn fritters in the early hours of the morning just because I woke up and was hungry.
I was also curious as to how to make them. Pretzels are one of the few foods (other than fermented shark meat) that has a basic pH (ie above 7). Now upon reading how to make them I realise it is because they are boiled for about a minute before they are baked in a pot of water and baking soda. Boiling the pretzel in basic solution allows for the interior of the pretzel to puff up making it softer but also chewier. The baking soda allows the exterior to form a nice golden brown crust. Its an odd step compared with usual bread baking but it was actually really cool to see the small pretzels knots puff up in such a quick space of time.
Now I used the dough hook on my stand mixer to knead the dough but kneading by hand (which was originally called for) is totally sufficient and in itself very theraputic.
I have a literature review to write so I am gonna stop waffling on and get to the point!
New York Style Soft Pretzels
Adapted from The Sophisticated Gourmet (who I believe adapted it from Martha Stewart)
Makes 12
2 1/4 teaspoons active dry yeast
2 teaspoon white sugar
1 cup warm water
1 cup (128g) high grade flour
2 cups (256g) plain flour
2 teaspoons salt
35g softened butter
2 tablespoons baking soda
2 teaspoons sugar
7cm worth of boiling water in a medium sized pot (super accurate I know)
Chunky sea or rock salt
1 egg, beaten
1 teaspoon water
In a small bowl, activate the yeast with the warm water and sugar for around 10-15 minutes. It should become very foamy. If nothing happens you need to get new yeast.
In a large bowl, mix together the flours and the salt. Either use your mixer to rub in the butter or do this by hand. You want to achieve a smooth crumb with no visible lumps of butter.
Once the yeast has been properly activated, pour the yeast liquid into a well in the centre of your flours. Use a spoon to bring the dough together.
Either tip the dough onto a lightly floured bench and knead the dough for around 5 minutes or pop it into your cake mixer with the dough hook and leave it to be kneaded for around 5 minutes also. The dough should become smooth and elastic.
Grease up a large bowl with a small amount of oil. Place the dough into this bowl, cover in cling film then leave to rise for an hour in a warm place (like on top of the hot water cylinder). You want the dough to double in size. Apparently you can also leave it in the fridge overnight, which is handy if you want to make these early in the morning.
Cut the dough into 12 portions. Roll out each ball into a rope around 20cm long.
Bring the rope up into a large U shape.
Take the two ends and twist them around each other twice.
Bring the ends back onto the curve of the U and press down lightly to attach them.
Preheat the oven to 250 degrees C (or as high as you can go) on bake.
Bring the water in the pot to a boil. Add the sugar and baking soda.
Using a slotted spatula place three of the pretzels in the boiling water at a time. Leave to boil for 45-60 seconds before removing and leaving to drain on a cooling rack. Repeat with the rest of the pretzels.
Transfer the puffed pretzels onto a baking tray lined with baking paper.
Mix the egg and the teaspoon of water together and brush this over each pretzel.
Sprinkle over a generous amount of salt and any other topping of your choice. Poppy and sesame seeds work well.
Bake for 15 minutes until the outer surface has turned a nice dark golden brown.
Serve warm!
Make sure you eat them within 12 hours of baking them. They aren't as good after that.
Enjoy!!!
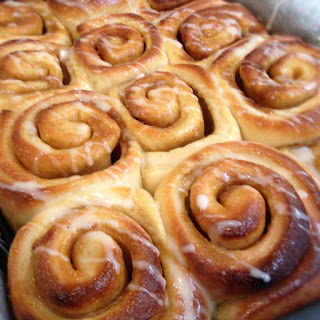
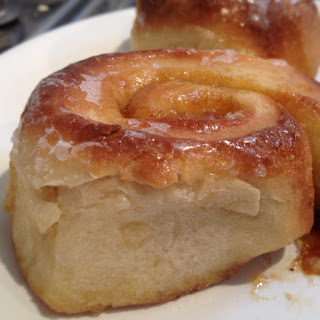
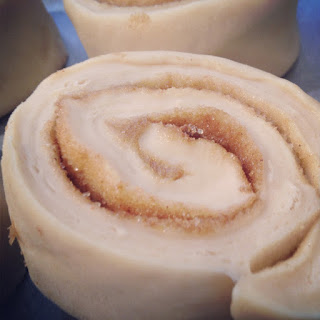
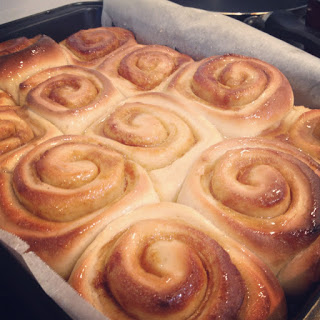
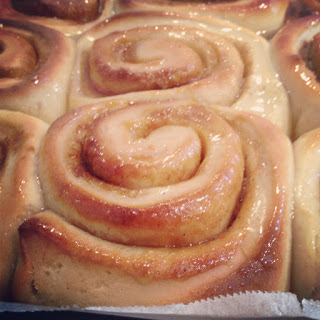
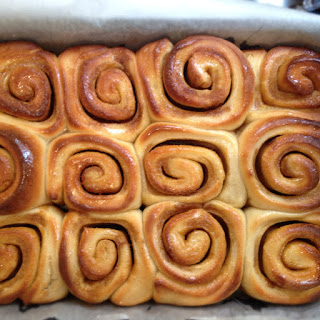
Sweet Sweet Cinnamon Buns
Bread has always fascinated me.
I have been fascinated from afar though. It has always seemed like such a laborious activity. All that kneading and all. We never had a bread maker at home (probably a good thing) and so I was never able to at least cheat the first few phases of the process.
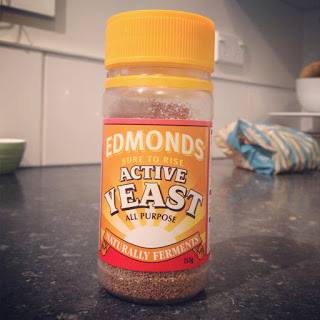
Yeast. Its a crazy little thing. This organism, dormant, is activated by the warmth and sugar you give it and then it goes on to expand your dough. Then to thank the yeast for all the hard work it has done, we kill it at 220 degrees in our ovens.
Anyway, I have always wanted to make cinnamon scrolls. They smell so good and with icing drizzled on top they are to die for! I got inspired by this post here. They looked amazing.
I chose not to use the recipe on that post. I didn't have enough oil. I found one on Annabel Langbein's website that looked just as tasty.
The only problem was when I was going to make these buns. I had exams and I was living in the library which I am pretty sure doesn't have an oven.
My last exam was yesterday. So as a treat to all those poor souls still stuck in the central library I made these buns with plenty of love and nurture and brought them around for morning tea time. The smell of hot buns wafted through the library air. I got a few curious looks as I walked past carrying my large baking tray. I probably made as many enemies as I made friends. But unfortunately I could only brighten the days of 20 souls with my 20 buns.
I recommend starting this the night before if you want to make them for morning tea. My yeast was coming to the end of its most active period so not only did I give it a bit of extra time to rise in our toasty warm hot water cupboard but I put a bit more yeast than the 3 teaspoons Annabel told me to. Just to make sure they rose.
If you have a bread maker, just prepare the dough in the bread maker using these ingredients just as you usually would but take it out once the dough has risen and then roll them out.
Lets make some magic shall we?
Sweet Sweet Cinnamon Buns
Adapted from Annabel Langbein's recipe
Makes 20 (generous buns)
For the dough:
2 cups milk
3/4 cup white sugar
3 teaspoons active dry yeast
125g butter, melted but not hot
6 cups high grade flour (you need to use high grade as it has a better gluten content which is essential for the structure of the dough)
1 teaspoon salt
For the filling:
50g butter, softened
1/2 cup brown sugar
1 tablespoon cinnamon
For the glaze:
1/4 cup sugar
3 tablespoons sugar
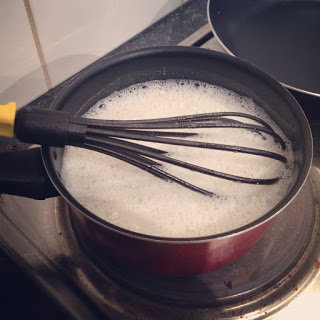
In a small saucepan, warm the milk until tepid, ie only just warm to the touch. Take it off the heat and whisk in the sugar to dissolve. Sprinkle in the yeast and whisk that in too. Leave the yeast to activate for ten minutes or so. Leave it somewhere warm to help the process. You don't want to heat the milk too much or else you will kill the yeast. Remember they are living organisms, how would you like it if someone boiled you in a saucepan of milk? Then whisk in the room temperature melted butter.
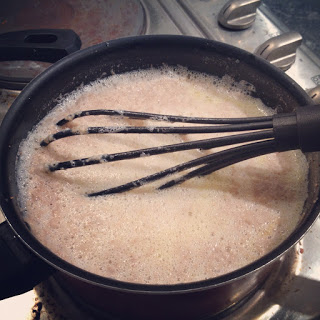
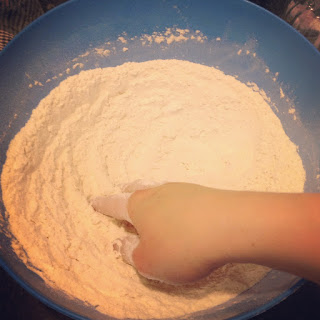
In a large bowl, mix together the flour and salt. Make a well in the centre. Once the yeast has fully activated (it smells wonderfully yeasty, slightly alcoholic and it has gone foamy) pour the milk and butter mixture into the well. Using a wooden spoon (or whatever) stir the dough until it is a roughly mixed sticky blob.
Take all your rings and bangles off! haha unless you want to get bits of dough stuck in them. Or worse, the bacteria from underneath the rings in your dough! Gross!
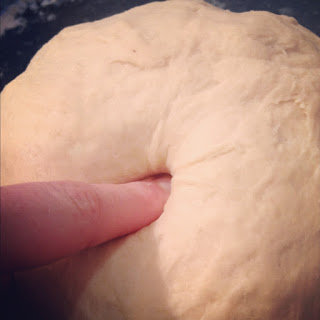
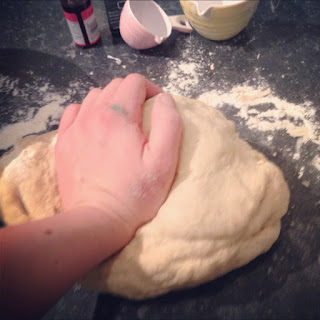
Sprinkle the bench with a bit of flour and tip the dough onto the bench. Start kneading the dough. This will help the mixing of ingredients. The theory behind the kneading is that you help to work and develop the protein, gluten, in the flour. This helps the dough become more elastic and stretchy. This allows for the dough to form pockets of carbon dioxide (produced by the yeast) and stay that way until the dough is baked. The more you knead the more light and fluffy the final product will be. If you cant be bothered, find a nice boy to do it for you. Convince them that it is a good forearm work out (which it is!). If you don't know how to knead probably the easiest way is to either ask your mum or to just youtube it. You want to knead for around ten minutes, or until the dough is nice and soft and elastic (Annabel describes it as silky, which I think is perfect!). When you press your finger gently into the dough you want the indentation to stay there. That means it is kneaded enough.
Lightly grease a large bowl (not a cake tin like I did!) and place your dough inside. Leave your dough to rise in a nice warm place. The hot water cupboard works well so does making a nice warm hot water bath in the kitchen sink (just be sure that no one turns the tap on with your dough underneath). As I was a little uncertain about the integrity of my yeast, I left mine in the hot water cupboard overnight to rise. If your yeast is nice and fresh, try leaving it for just an hour, that should do the trick.
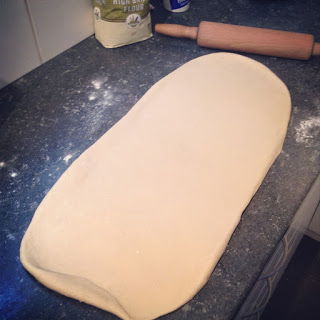
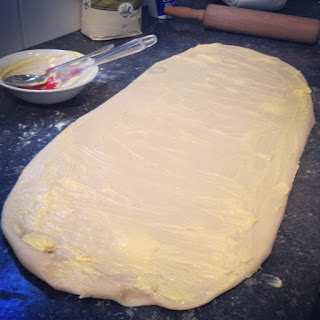
Once your dough has risen, knock it around a bit (remove some of the big air pockets). On a lightly floured bench, roll the dough out into a rectangle around 30x60cm in size.
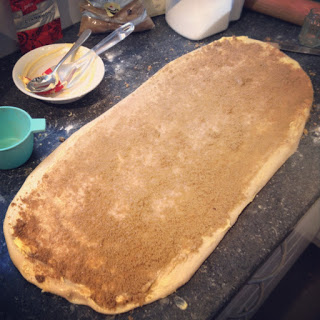
Spread the softened butter for the filling all over the dough rectangle. Sprinkle over the sugar and cinnamon.
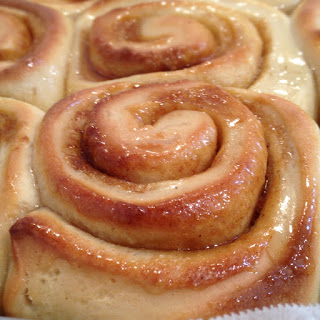
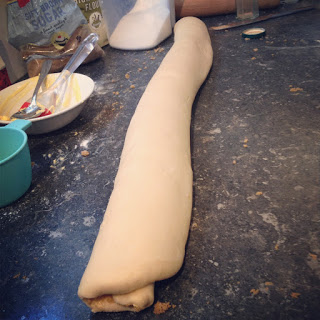
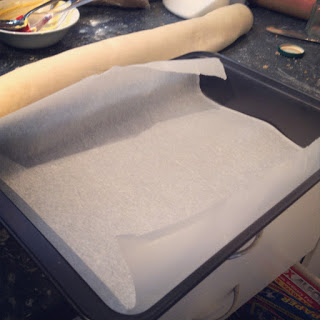
Next, tightly pinch one of the longer edges of the rectangle and start to tightly roll the dough until you have one long sausage. With a sharp, non serrated knife, slice the sausage into 3cm thick slices. Arrange the slices in a baking tray or large cake (lined with baking paper) with 1-2 cm spacing between each one. You may need another tray (I used my brownie tin and my large cake tin). Leave the scrolls somewhere warm to rise again. I left them for an hour but you will probably only need 20 minutes if you have super active yeast. While they are rising, preheat the oven to 220 degrees.
Once the scrolls have risen, pop them in the oven for 15 minutes. While they bake, make up the glaze by placing the water and sugar in a saucepan and boiling until a thick syrup forms. This takes around 5 minutes.
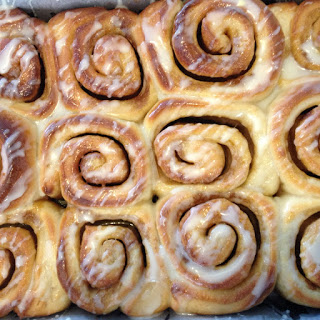
When the buns come out of the oven, brush them with plenty of glaze straight away.
I drizzled some very thin white vanilla buttercream icing over mine once they had cooled down. Icing them is a good idea if you are planning on serving them later in the day when they have cooled. If you ice them when they are too warm the icing melts and makes a mess.
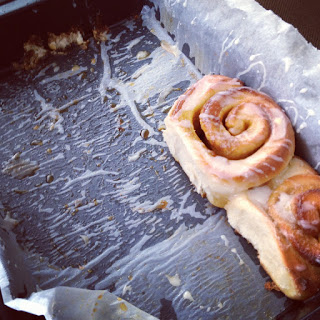
Flip these were so good. Unfortunately they disappeared too quickly for me to take photos of them (plus awkward food photography is frowned upon in the library).
If you are too impatient to wait for them to cool, devour them straight away! You house will be filled by now with the sweet aroma of sweet baked bread. It is heavenly.
The holidays are coming up, if you have the time I highly recommend you give these a go. They will most certainly make you friends and amaze your family.

I got a wee bit nostalgic (the worlds worst emotion) after delivering these for my time here at Otago. I am here next year for my fourth year but quite a few of my friends are moving on, graduating, doing placements in other cities. It kind of feels like the beginning of the end. Soon we will be grown up and expected to know everything. To be honest I have no idea what I am doing and I am lucky that everything so far has sort of fallen into place.


So to all of you leaving dear Dunedin this year, I will miss you. I will miss you a lot. Good luck!
Sophie x
I have been fascinated from afar though. It has always seemed like such a laborious activity. All that kneading and all. We never had a bread maker at home (probably a good thing) and so I was never able to at least cheat the first few phases of the process.
Yeast. Its a crazy little thing. This organism, dormant, is activated by the warmth and sugar you give it and then it goes on to expand your dough. Then to thank the yeast for all the hard work it has done, we kill it at 220 degrees in our ovens.
Anyway, I have always wanted to make cinnamon scrolls. They smell so good and with icing drizzled on top they are to die for! I got inspired by this post here. They looked amazing.
I chose not to use the recipe on that post. I didn't have enough oil. I found one on Annabel Langbein's website that looked just as tasty.
The only problem was when I was going to make these buns. I had exams and I was living in the library which I am pretty sure doesn't have an oven.
My last exam was yesterday. So as a treat to all those poor souls still stuck in the central library I made these buns with plenty of love and nurture and brought them around for morning tea time. The smell of hot buns wafted through the library air. I got a few curious looks as I walked past carrying my large baking tray. I probably made as many enemies as I made friends. But unfortunately I could only brighten the days of 20 souls with my 20 buns.
I recommend starting this the night before if you want to make them for morning tea. My yeast was coming to the end of its most active period so not only did I give it a bit of extra time to rise in our toasty warm hot water cupboard but I put a bit more yeast than the 3 teaspoons Annabel told me to. Just to make sure they rose.
If you have a bread maker, just prepare the dough in the bread maker using these ingredients just as you usually would but take it out once the dough has risen and then roll them out.
Lets make some magic shall we?
Sweet Sweet Cinnamon Buns
Adapted from Annabel Langbein's recipe
Makes 20 (generous buns)
For the dough:
2 cups milk
3/4 cup white sugar
3 teaspoons active dry yeast
125g butter, melted but not hot
6 cups high grade flour (you need to use high grade as it has a better gluten content which is essential for the structure of the dough)
1 teaspoon salt
For the filling:
50g butter, softened
1/2 cup brown sugar
1 tablespoon cinnamon
For the glaze:
1/4 cup sugar
3 tablespoons sugar
In a small saucepan, warm the milk until tepid, ie only just warm to the touch. Take it off the heat and whisk in the sugar to dissolve. Sprinkle in the yeast and whisk that in too. Leave the yeast to activate for ten minutes or so. Leave it somewhere warm to help the process. You don't want to heat the milk too much or else you will kill the yeast. Remember they are living organisms, how would you like it if someone boiled you in a saucepan of milk? Then whisk in the room temperature melted butter.
In a large bowl, mix together the flour and salt. Make a well in the centre. Once the yeast has fully activated (it smells wonderfully yeasty, slightly alcoholic and it has gone foamy) pour the milk and butter mixture into the well. Using a wooden spoon (or whatever) stir the dough until it is a roughly mixed sticky blob.
Sprinkle the bench with a bit of flour and tip the dough onto the bench. Start kneading the dough. This will help the mixing of ingredients. The theory behind the kneading is that you help to work and develop the protein, gluten, in the flour. This helps the dough become more elastic and stretchy. This allows for the dough to form pockets of carbon dioxide (produced by the yeast) and stay that way until the dough is baked. The more you knead the more light and fluffy the final product will be. If you cant be bothered, find a nice boy to do it for you. Convince them that it is a good forearm work out (which it is!). If you don't know how to knead probably the easiest way is to either ask your mum or to just youtube it. You want to knead for around ten minutes, or until the dough is nice and soft and elastic (Annabel describes it as silky, which I think is perfect!). When you press your finger gently into the dough you want the indentation to stay there. That means it is kneaded enough.
Lightly grease a large bowl (not a cake tin like I did!) and place your dough inside. Leave your dough to rise in a nice warm place. The hot water cupboard works well so does making a nice warm hot water bath in the kitchen sink (just be sure that no one turns the tap on with your dough underneath). As I was a little uncertain about the integrity of my yeast, I left mine in the hot water cupboard overnight to rise. If your yeast is nice and fresh, try leaving it for just an hour, that should do the trick.
Once your dough has risen, knock it around a bit (remove some of the big air pockets). On a lightly floured bench, roll the dough out into a rectangle around 30x60cm in size.
Spread the softened butter for the filling all over the dough rectangle. Sprinkle over the sugar and cinnamon.
Next, tightly pinch one of the longer edges of the rectangle and start to tightly roll the dough until you have one long sausage. With a sharp, non serrated knife, slice the sausage into 3cm thick slices. Arrange the slices in a baking tray or large cake (lined with baking paper) with 1-2 cm spacing between each one. You may need another tray (I used my brownie tin and my large cake tin). Leave the scrolls somewhere warm to rise again. I left them for an hour but you will probably only need 20 minutes if you have super active yeast. While they are rising, preheat the oven to 220 degrees.
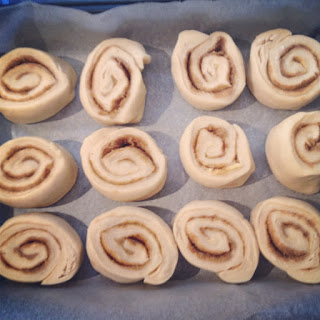 |
| Before being left to rise again |
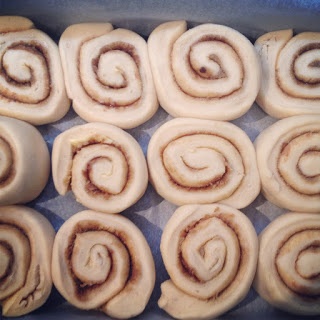 |
| After the second round of rising! |
Once the scrolls have risen, pop them in the oven for 15 minutes. While they bake, make up the glaze by placing the water and sugar in a saucepan and boiling until a thick syrup forms. This takes around 5 minutes.
When the buns come out of the oven, brush them with plenty of glaze straight away.
I drizzled some very thin white vanilla buttercream icing over mine once they had cooled down. Icing them is a good idea if you are planning on serving them later in the day when they have cooled. If you ice them when they are too warm the icing melts and makes a mess.
Flip these were so good. Unfortunately they disappeared too quickly for me to take photos of them (plus awkward food photography is frowned upon in the library).
If you are too impatient to wait for them to cool, devour them straight away! You house will be filled by now with the sweet aroma of sweet baked bread. It is heavenly.
The holidays are coming up, if you have the time I highly recommend you give these a go. They will most certainly make you friends and amaze your family.
I got a wee bit nostalgic (the worlds worst emotion) after delivering these for my time here at Otago. I am here next year for my fourth year but quite a few of my friends are moving on, graduating, doing placements in other cities. It kind of feels like the beginning of the end. Soon we will be grown up and expected to know everything. To be honest I have no idea what I am doing and I am lucky that everything so far has sort of fallen into place.
So to all of you leaving dear Dunedin this year, I will miss you. I will miss you a lot. Good luck!
Sophie x