Orange and Lemon Polenta Poppy Seed Cake

I am supposed to be sleeping, getting ready for a long flight to Hawaii in the morning.

But no, I cannot leave on holiday without first getting my affairs in order (ie posting for both of my blogs).

I made this cake last week with my excellent cousin Georgia. We were lacking in a car to drive places and we both kinda felt like cake.

For Mum's birthday Jack and I bought her the new Ripe Deli book

Ripe Recipes: A fresh batch.

Boy is it a great book! I have photocopied what seems to be every second page.

Amongst the wonderful recipes in this book was a recipe for gluten free orange and lemon polenta loaves.

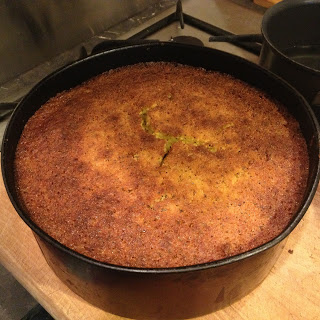
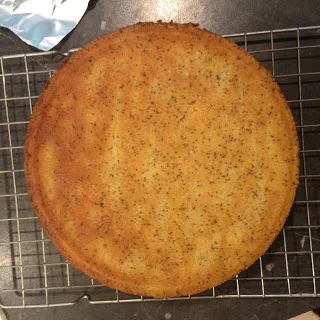
They looked so moist and excellent in the picture. We had polenta, and ground almonds and plenty of oranges and lemons! The only thing we didn't have were the two loaf tins required. So we decided to turn this into a cake. And a large cake at that.

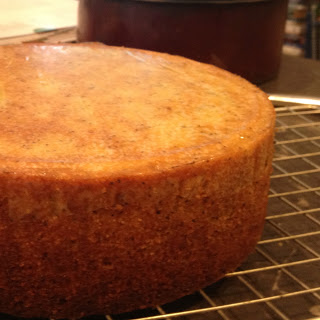
We used a 23cm round tin with decently high sides. The cake rose right to the very top! It was seriously the tallest single layer cake I had ever seen. It was really impressive looking. The high fat content also ensured the cake's easy removal from the tin. Overall making this cake was almost as much of a dream as that heart shaped feijoa cake a few weeks back.

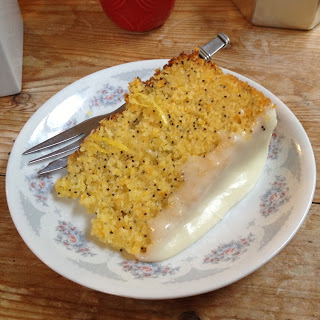
This recipe was supposed to have chia seeds in it. We used poppy seeds instead. Sure they don't have all the super nutrients that chia seeds supposedly have but they give the same speckled effect.

Polenta comes from very finely ground corn, hence why this cake is gluten free (provided you use maize corn flour and gf baking power). The polenta lends quite a corny taste to this cake as well as a soft gritty texture. It is interesting and strangely addictive. The moistness of this cake is to die for. Make sure you put plenty of zest lemon icing on the top as well! We were too impatient to munch on cake while watching a movie so the warm cake caused the icing to dribble everywhere but really at the end of the day who cares?

We found the method of this cake really really weird. You have to boil the oranges and lemon for ten minutes then whizz them up in the blender to a pulp. Then this all gets added to the cake. Adding to the moistness I suppose.

Are you uncomfortable with the number of times I have said moist in this post so far?

Tehe.

Orange and Lemon Polenta Cake with Poppy Seeds

Makes one very tall 23cm cake

2 oranges, topped and tailed so that they can stand without rolling around in the saucepan.

1 lemon, topped and tailed

1 1/4 (210g) cup finely ground polenta

1/4 cup (35g) cornflour

1 cup (100g) ground almonds

2 teaspoons baking powder

3 tablespoons poppy (or chia) seeds

250g butter, softened

2 cups (440g) castor sugar

1 teaspoon vanilla

6 large eggs

Preheat the oven to 160 degrees on bake.

In a medium sized saucepan, place the oranges and lemon and then pour in boiling water until it reaches two thirds of the way up the fruit. Boil for five minutes, flip over the fruit then boil for another five. Remove from the water and set aside to cool a little.

Cream together the butter, sugar and vanilla. Add the eggs one at a time until the incorporated and fluffy.

In a separate bowl, mix together the polenta, almonds, corn flour, baking powder and poppy seeds.

In a blender or small food processor, blend the oranges and lemon to a smooth pulp.

Add a cup of the dry polenta mix and a few dollops of the pureed fruit mix to the butter-sugar-egg mix and mix until incorporated. Continue adding the polenta and puree alternately until it has all been mixed in.

Pour the mixture into a large, tall, lined and greased cake tin.

Bake for an hour then cover the tin with tin foil and bake for a further 30-40 minutes or until a skewer comes out clean.

Leave to cool before removing from the tin.

Once fully cool ice with a lemon glaze:

25g melted butter

2 cups icing sugar

juice of 1 lemon

Enjoy!

Lemonade Date and Orange Scones

Greetings from Taupo Bay.


I did write this from the kitchen table looking out at the glorious ocean but due to the excellent lack of wifi in this house (I do really mean excellent - but more on that later) I am uploading this from a tiny Telecom phone booth down the road. Its a pretty sad site actually. There are four of us; Jack, Tessah, myself and some random (we can call her wifi hog) all lined up against a stone wall with our iPhones (and in my case MacBook Pro) out.


We are staying at our family friends place, I have asked them to formally adopt me so they won't be family friends for much longer! haha but if I ever write a cookbook I will ask to use this kitchen as the backdrop. 

It looks straight out onto the beach. As in drop-something-out-the-window-accidentally-and-it-will-almost-land-on-the-sand straight onto the beach. There is something about this kitchen encourages you to slow down, relax and to take the time in enjoying the cooking process. I have been itching to make bread from scratch all week (but alas! no yeast!). Oh and the light that comes in from the windows is truly magical!


The best thing about this house is the lack of reception and lack of wifi. No Facebook. No Instagram. No hobbit game (much to Jack's dismay) and no texts (not that anyone texts me anyway). I find keeping up with the previous quite tiring and stressful. Also, seeing people's overseas holiday snaps on facey ruins your own beachfront paradise. We always want what we don't have right? Plus all this lack of telecommunication has forced us into family PUZZLE TIME! (did you say that like in the drink driving ad?)


We now hate puzzles. 


Anyway, back to the magic that is the lighting. 


See? Don't these scones just looks super excellent when they are sun soaked?

What this lighting and sea view has encouraged me to do is to make copious amounts of scones. The wonderful circular chopping board they have here might have helped also as it looks excellently rustic with a batch of scones and the white ramekins of butter and jam atop it. 


The best type of scone is a date scone. A date and orange zest scone is even better. And what makes a date and orange scone even better? An easy peasy simple as recipe that basically has three ingredients (minus the dates and orange zest). 


I think I made these in pinwheel form last year (where brown sugar and cinnamon are rolled into the dough and then cooked to make pretty pinwheels which are then iced). 

However what I have not made for you are scones of the date variety.

I love dates. Date cakes, date slices, dates dates dates.

On that note, Jamal (a fellow date lover), remind me to make these for you. 


I compensate for my lack of romantic dates with the the more delicious fruit variety. I wonder why I have so few dates when I can make scones like these.

Anyway when shopping for dried dates I recommend have a good feel of the packets. Sure, when people see you fondling and groping packets of dates they will give you odd looks but finding a good, moist packet of juicy dates is far more important than the opinions of others. I find the Cinderella brand with the blue packet (not the white packet) are a decent date. 

Want to know the secret to juicy date scones?

You soak them in boiling water for five to ten minutes before draining then adding to the mixture.. What is even better is if you have a bit of orange juice lying around, pour that over them to cover then zap them in the microwave for two to three minutes, then drain and add.. Delish!

To these scones, I just soaked them in boiling water, drained them then added the juice of the orange that I zested then add the juice and the dates to the flour mix. 

I should probably  mention something about the unorthodox base ingredient list. Cream. Lemonade. Self raising flour. 

Trust me it works. It produces the most luscious, tender scones ever and you don't have to rub in a single gram of butter. The cream provides the fat content and the lemonade the sugar. You can substitute the self raising flour for standard flour with the addition of two teaspoons of baking powder for every cup of flour used. So if you have a scone craving on the way home from work or uni, stop at the dairy (Rob Roy flashes into my mind as I write this), grab a small bottle of cream and a can of sprite and whip some up in 20 minutes! 

To the flour you add equal quantities of the lemonade and cream. It usually lies at around a cup of each. Somedays, depending on the humidity you will need more or less. It doesn't have to be an exact science. The final dough should be soft and slightly sticky. Also, don't worry if there are patches of unmixed flour, it will sort itself out in the oven.

On that note I should give you Allie Edmonds (my mum)'s top tips for excellent scones.
  1. Do not over handle the dough. You will overwork the gluten and make them tough and chewy. The heat from your hands also does the dough no favours.
  2. Use a knife to mix the dough ingredients. This prevents over hand handling and just works really well.
  3. Place the scones close together on the baking tray. This will prevent them from drying out too much and will make them rise up rather than out.
  4. Pat the tops of each scone will a bit of milk just before popping in the oven. It makes the tops all nice.


With these commandments you can overcome any  preconceived scone fear you may have had. 

Lemonade Date and Orange Scones
makes 8 large scone wedges or 12 smaller squares

4 cups self raising flour (or 4 cups plain flour + 8 teaspoons baking powder)
1 cup full fat cream 
1 cup lemonade
Half a packet of dates (2 cups ish), chopped
Zest and juice of one orange

Preheat the oven to 200 degrees on bake and line a baking tray with baking paper.

Soak the dates in boiling water for five or so minutes. 

Place the flour and zest in a bowl and mix to spread the zest evenly throughout. 

Drain the dates, squeeze over the juice of the orange then add this to the flour. 

Mix the dates in with the flour to evenly distribute them.

Make a well in the centre of the flour and pour in the cream and lemonade. Use a knife to stir the mixture around until it all roughly comes together. 

Tip the dough onto a floured board or bench. 

Use your hands to do the last of the mixing, then shape the dough into a flattened circle or rectangle about 5cm thick. 

Using a sharp knife, cut the circle into eight wedges or the rectangle into 12 or 9 squares. 

Place on the baking tray with just less than a centimetre between them. Pat with milk then bake for 15 minutes or until the tops are golden. 

If you want you could sprinkle over a bit of white sugar, just to give the tops a bit of a delicious crunch.

Serve with butter and jam and prepare for the exclamations of gratitude from friends and family who will automatically assume you are some glorious creature who has spent the morning rubbing butter and flour in between your fingers. 


Enjoy!


Orange and Almond Baby Bundts

Hi there!

This is really just a quick update that deleted itself whilst I was writing it on my way back home from a day at the beach.


After my very successful lemon baby bundt cakes I decided to try another flavour. I saw a orange and almond version on a website somewhere but the actual recipe itself was much larger than my Nigella one which would have posed an issue for my already very full six bundt pans.


I decided to just use the Nigella recipe is my last post and instead of using lemon zest and juice I used orange zest and juice as well as a couple of drops of almond essence.


I love almond essence. It is a very strong and potent one so don't use it as you would vanilla because it can taste very over powering very quickly. Quite literally a few drops will do. Almond essence reminds me of Christmas cake; the best cake of all. The best part of the cake of course is the almond icing that goes atop of this marvellous cake. We have just finished our Christmas cake (it didn't get iced until New Years eve) and I already miss the wonderful almondyness that it had.


So for those of you who also pine after the delicious aroma of almond flavoured things then definitely go ahead and add the essence. For those of you who cut off the icing of a Christmas cake (God have mercy on your soul) then leave it out, it is still just as delicious without.


Once again this is the easiest cake recipe you will ever make. No beaters required. So great.

Unfortunately I was running off to my friends house for dinner (hence why I made these cakes) so I don't have any pretty pictures, just one I took whilst I ran down the stairs by the side of our house.


Orange and Almond Baby Bundts
Adapted from Nigella Lawson's How to be a Domestic Goddess
Makes six little cakes

125ml (1/2 cup) plain unsweetened yoghurt
75g butter, melted
2 large eggs
zest of one orange
1/8 teaspoon almond essence
150g (1 1/4 cups) Plain flour
125g (1/2 cup) caster sugar
1/2 teaspoon baking soda
pinch of salt

For the icing:
1 1/2 cups icing sugar, sieved
juice of half to one orange
1 teaspoon of butter, melted
2 drops almond essence


Preheat the oven to 170 degrees and grease and flour the baby bundt tins.

Sieve together the flour, sugar, baking soda, salt and zest.

In a separate jug or bowl, whisk together the melted butter, eggs, essence and yoghurt.

Add the wet ingredients to the dry ingredients and gently mix until no more flour clumps can be seen. Try not to overmix as this will result in a dense and chewy cake.

Fill the tins until just below the top of the centre tube (the inverse of the bundt hole), sprinkle over a little white sugar and bake for 20-25 minutes until a skewer comes out clean or and cakes bounce back when touched.

Leave to cool a little before removing the cakes form their tins. Soft, freshly baked cake is delicate and if the cakes are too hot when they are removed they can fall apart. Also don't leave them to fully cool in the tins as this can result in them sticking to the tins.

leave to cool completely on a wire rack before icing.

To make the icing, use as much of the orange juice as necessary to make a thick but still drippable mixture. If it is too runny the icing will just run off the cake and only the bench creating a very sticky mess to wipe up later.

Decorate the cakes with a few long strands of orange zest if you wish!


I think these were better that the lemon cakes!
Enjoy!!